
Pruning
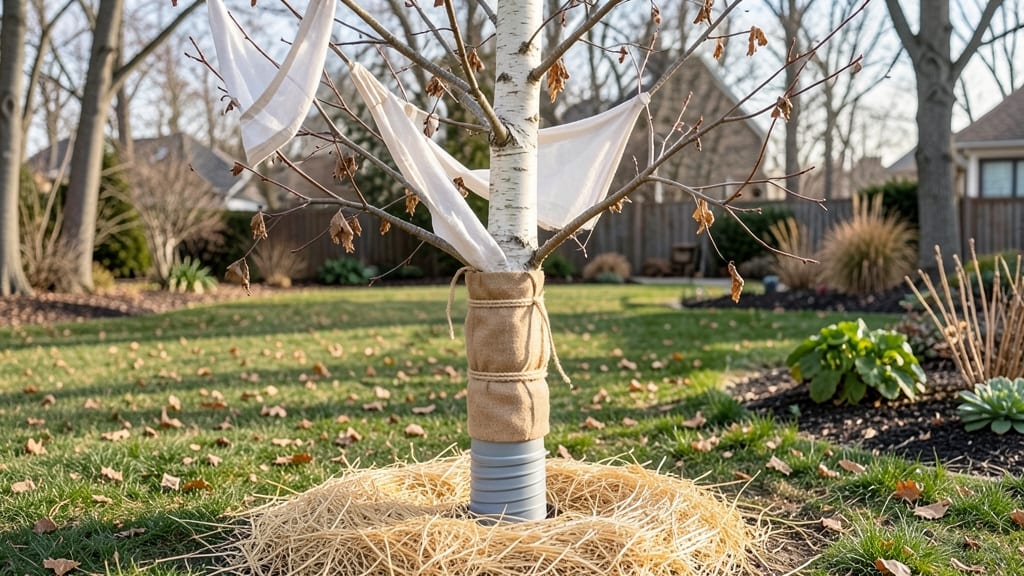
Winterizing young trees with tree bags is the secret weapon against frost cracks and sun scald that ruin so many new plantings. 🌳 I've seen firsthand how a simple wrap can mean the difference between a thriving tree and one that struggles for years to recover from winter damage.
The right material creates a microclimate that protects bark, roots, and even small branches from extreme temperature swings.
You'll need breathable burlap or specialized tree wrap—not plastic or thick materials that trap moisture and cause rot. The best time to apply them is after the ground freezes but before heavy snowfall, usually in late November or December.
A properly installed wrap lasts through winter and can be removed in early spring before new growth starts.
What you get is healthier bark, fewer frost cracks, and trees that bounce back faster in spring. The wrap also deters rodents and rabbits that might otherwise gnaw at tender bark. I've seen wrapped trees grow 2-3 feet more in their first season compared to unwrapped ones.
For mature trees, focus on mulch and proper pruning instead. But for young trees under 3 inches in diameter, tree bags are the simplest, most effective protection you can provide. Here's exactly how to do it right—no guesswork involved.
📚 In This Guide
- What you need
- Instructions
- Tips and common mistakes
- Wrapping up and next steps
What you need
- ● Tree bags (insulated root protectors): 1 per tree (size should match the tree’s trunk diameter—check product specs or measure your tree’s circumference).
- ● Pro tip: 💡 Opt for breathable, frost-resistant fabrics (e.g., burlap, felt, or commercial root wraps) to prevent moisture buildup.
- ● Measuring tape: For accurate bag sizing (especially for DIY projects).
- ● Scissors or a utility knife: For trimming bags to fit snugly around the trunk.
- ● Staple gun + staples: To secure bags tightly (if not using Velcro or ties).
- ● Twine, zip ties, or Velcro straps: For adjustable, non-damaging fastening.
- ○ Mulch (optional but recommended): 2–3 inches of organic mulch (e.g., straw, wood chips) around the base (keep it 3–4 inches away from the trunk to avoid rot).
- ● Gloves: Protect your hands from rough edges or cold weather.
- ● Ladder (if needed): For reaching higher tree trunks safely.
- ● Weather forecast check: Aim to wrap trees on a dry, calm day (avoid frost or rain).
- ● Tree health assessment: Inspect for pests/disease before wrapping—address issues first!
- ● Prune dead branches in early fall (if needed) to reduce weight on the tree.
- ● Reflective tape: Add to bags for visibility in snowy areas.
- ● Heated tree wraps: For extreme climates (battery-powered options available).
- ● Tree guards (plastic collars): To protect the trunk from gnawing rodents.
- ● Moisture barrier fabric: Layer under mulch in wet climates to prevent soggy roots.
How to protect young trees with winter bags
Here's the straightforward method I use to shield tender trees from harsh winter winds and frost.
🪴 Step 1: Choose the Right Tree Wrap Material
For young trees, I recommend breathable burlap or tree-specific fabric wraps—these allow air circulation while blocking harsh winds. Avoid plastic sheets or heavy tarps, which trap moisture and encourage rot. Measure the circumference of your tree trunk at chest height and add 12 inches to the total for overlap and secure fastening.
If you're using burlap, look for undyed, untreated material—chemical treatments can harm bark. For extra insulation, layer 2-3 inches of straw or wood shavings inside the wrap before securing it. This creates a thermal barrier that keeps roots warmer during freeze-thaw cycles.
✂️ Step 2: Wrap the Trunk Properly
Start wrapping 6 inches below the soil line and work upward to just below the lowest branches. This protects the most vulnerable part of the tree—the root flare and lower trunk. Overlap each layer by 2-3 inches and secure with soft tree ties or twine (never wire or plastic straps, which can girdle the trunk).
Pull the wrap snugly but not tightly—you should be able to slide one finger between the wrap and bark. Too-tight wraps restrict growth and can damage bark. If your tree is particularly thin (under 2 inches in diameter), consider using tree sleeves designed for small trunks instead of wraps.
🌱 Step 3: Add Mulch for Root Protection
Spread 3-4 inches of organic mulch (like shredded bark or straw) over the root zone—this extends 6-12 inches outward from the trunk. Avoid piling mulch against the trunk itself, as this can cause rot or pest issues. Instead, create a doughnut-shaped ring around the base.
For extra insulation in Zone 5 or colder, top the mulch with a 12-inch layer of leaves or evergreen boughs. This creates a natural snow blanket that insulates roots during temperature swings. Check the mulch in early spring—if it’s compacted or moldy, fluff it up to improve airflow.
☀️ Step 4: Secure and Monitor Through Winter
Once wrapped, anchor the top of the wrap with a stake or brick to prevent it from blowing off in windy conditions. In areas with heavy snowfall, gently brush snow away from the trunk to avoid snow mold—but leave snow piled around the root zone to provide extra insulation.
Check your tree once a month during winter to ensure the wrap hasn’t shifted or become waterlogged. If you notice dark spots on the bark or mold growth, remove the wrap immediately, clean the trunk with a damp cloth, and rewrap with fresh material. This prevents long-term damage.
⏰ Step 5: Remove Wraps at the Right Time
Take wraps off as soon as the ground thaws in early spring—usually by late March or early April, depending on your climate. Leaving them on too long can traps moisture and encourage fungal growth. Use a sharp knife or scissors to cut the ties carefully to avoid damaging the bark.
After removing the wrap, inspect the trunk for sunburn (common on thin-barked trees like birch or maple). If needed, paint the exposed trunk with white latex paint to reflect sunlight and prevent damage. This is especially important for trees that spent winter wrapped but now face sudden spring sun exposure.
Tips & tricks for perfect tree protection with winter bags
These simple strategies will help you shield young trees like a pro—no green thumb required.
Material Matters: When you're choosing your wrap, remember that breathability is key. Burlap works great, but if you're in a particularly windy area, consider using a tree-specific fabric wrap—it's designed to handle harsh conditions better. For extra insulation, especially in colder climates, add that 2-3 inches of straw or wood shavings inside the wrap before securing it. This little trick creates a thermal barrier that can make all the difference during freeze-thaw cycles.
Precision Placement: In Step 2, when you're wrapping the trunk, focus on that 6-inch section below the soil line—this is where the root flare and lower trunk are most vulnerable. Don't forget to leave a little space between the wrap and the bark; you should be able to slide one finger between them. Too-tight wraps can actually restrict growth and damage the bark. For thinner trees (under 2 inches in diameter), tree sleeves are a game-changer—they're designed to fit snugly without causing harm.
Mulch Magic: When you're adding that 3-4 inches of organic mulch in Step 3, think of it as creating a doughnut-shaped ring around the base. This prevents rot and pest issues while keeping roots warm. For extra insulation in Zone 5 or colder, top that mulch with a 12-inch layer of leaves or evergreen boughs. This natural snow blanket can be a lifesaver during temperature swings. Just remember to check the mulch in early spring—fluff it up if it's compacted or moldy to keep airflow moving.
Springtime Inspection: When you're ready to remove the wraps in late March or early April, take a moment to inspect the trunk for sunburn, especially on thin-barked trees like birch or maple. If you notice any damage, a quick coat of white latex paint can reflect sunlight and prevent further harm. This is a simple but effective way to give your trees a smooth transition into spring.
Pro Tips for Tree Bags For Winter
- These simple strategies will help you shield young trees like a pro—no green thumb required.
- Material Matters: When you're choosing your wrap, remember that breathability is key.
- Precision Placement: In Step 2, when you're wrapping the trunk, focus on that 6-inch section below the soil line—this is where the root flare and lower trunk are most vulnerable.
Frequently asked questions
When is the best time to apply tree bags for winter?
Apply tree bags before the first hard frost hits—typically 4–6 weeks before winter sets in. This gives roots time to adjust to the insulation. Check your local frost dates for precise timing. If you miss the window, don’t worry: bags can still help, but early application maximizes protection.
Are tree bags reusable, or should I replace them every year?
Most high-quality tree bags are reusable for 2–3 seasons if stored properly (clean, dry, and undamaged). Inspect them before reuse—rip or mold means it’s time for a new bag. Budget-friendly options like burlap degrade faster, so check your material’s durability before committing long-term.
What’s a good alternative if I don’t have tree bags?
No tree bags? Try these DIY fixes:
- Straw mulch (3–4 inches deep) around the root zone—cheap and effective.
- Cardboard + mulch: Wrap the trunk with damp cardboard, then top with mulch to retain moisture.
- Burlap sacks (fill with leaves/straw) for smaller trees.
Will tree bags protect against heavy snow or ice damage?
Tree bags shield roots from frost heave (freeze-thaw cycles) but won’t stop branches from breaking under snow/ice. For overhead protection, gently brush snow off limbs or use tree ties to support weak branches. Combine root + canopy care for full winter defense!
What do I do if mold or pests appear on my tree bag?
If you spot mold, remove the bag immediately, air out the roots for a day, and replace with a fresh, breathable bag. Pests (like rodents) are rare but possible—use pest-repellent mulch (e.g., cedar chips) beneath the bag if needed. Always store bags in a dry place to prevent future issues.
Wrapping up and next steps
Protecting your trees from winter’s harsh frost doesn’t have to be complicated—just wrap them in tree bags for winter! These simple, insulated covers shield roots from freezing temperatures, ensuring your trees thrive year after year.
Whether you’re a seasoned gardener or just starting out, taking this small step makes a big difference in your landscape’s health.
Ready to give your trees the winter care they deserve? Gather your supplies, follow the steps, and wrap them up before the first frost hits! 🌳❄️ Your future greenery will thank you!