
Landscaping
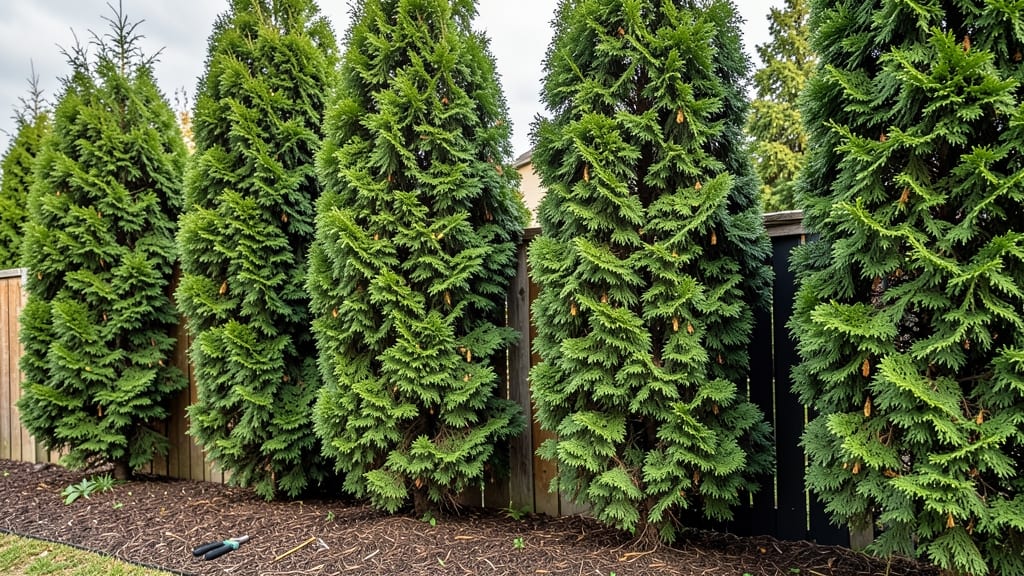
A cedar tree privacy fence isn’t just a screen—it’s a living wall that grows with your yard. 🌲 I planted mine five years ago, and now they form a 12-foot-tall evergreen barrier that blocks wind, noise, and nosy neighbors. The best part?
It’s a natural solution that only gets better over time. Spacing is everything—plant cedars 6 to 8 feet apart for a dense, uniform look. They thrive in full sun to partial shade and prefer well-drained soil, but they’re tough enough to handle rocky or sandy ground.
With proper care, they’ll fill in quickly, creating a lush, wind-resistant hedge that outlasts any wooden fence. By year three, you’ll have a solid privacy wall with minimal maintenance. The fragrant foliage adds a fresh, woodsy scent, and the dark green needles provide year-round color.
It’s the kind of screen that makes your backyard feel like a private retreat. Works for both new builds and existing yards—just adjust spacing for mature height. Here’s how to plant them right the first time!
📚 In This Guide
- What you need
- Instructions
- Tips and common mistakes
- Wrapping up and next steps
What you need
- ● Cedar trees or saplings: 10–20 (depending on desired height and spacing—aim for 10–15 feet apart for a dense screen). Choose Thuja plicata (Western Red Cedar) or Thuja occidentalis (Eastern White Cedar) for durability.
- ● Post-hole digger or auger: For planting stakes or support posts (if needed).
- ● Soil amendments: Compost or peat moss (1–2 bags) to improve drainage and nutrient-rich soil.
- ● Mulch: 2–3 bags of wood chips or pine straw to retain moisture and suppress weeds.
- ○ Fertilizer (optional): Slow-release, balanced fertilizer (10-10-10 or cedar-specific blend).
- ○ Drip irrigation or soaker hose (optional): For consistent watering during establishment.
- ● Shovel and spade: For digging planting holes (12–18 inches deep).
- ● Measuring tape and stakes: To mark planting lines and spacing.
- ● Wheelbarrow: For mixing soil amendments.
- ● Pruners or shears: To trim overgrown branches post-planting.
- ○ Gloves and knee pads (optional): For comfort during digging.
- ● Check local planting regulations (some areas restrict invasive species—cedar is generally safe!).
- ● Test your soil’s pH and drainage (cedars prefer slightly acidic, well-draining soil).
- ● Plan for sunlight exposure: Cedar thrives in partial shade to full sun.
- ● Schedule planting in early spring or fall for best root establishment.
Step-by-Step guide to planting a cedar tree privacy screen
Here's how I create a lush, wind-blocking evergreen barrier that grows into a natural privacy fence.
🌱 Step 1: Plan Your Layout and Spacing
First, measure your space and mark planting locations every 4-6 feet—this gives mature cedars enough room to fill in without overcrowding. I like to use a garden hose to create a rough outline before making permanent marks with stakes and string. Cedar trees need space to develop their full width, so don't be tempted to plant them closer just to speed up the process.
Check for underground utilities before digging—call 811 in the U.S. to have them mark your property lines. The last thing you want is to hit a buried line while planting. Also, consider your property line boundaries; cedars have aggressive root systems, so plant at least 2 feet back from any shared borders unless you've confirmed with your neighbor.
🪴 Step 2: Dig Holes and Prepare the Soil
Dig holes that are twice as wide as the root ball and just as deep. Use the soil you remove to create a small mound in the center of each hole—this helps position the root ball slightly above ground level, which prevents rot. I always loosen the sides of the hole with a shovel to encourage root spread into the surrounding soil.
Cedars prefer well-draining soil, so if your area has heavy clay, mix in some compost or sand to improve drainage. Avoid adding fertilizer at planting time—you'll shock the roots. Instead, focus on creating loose, aerated soil that lets the roots establish quickly.
☀️ Step 3: Plant and Water Thoroughly
Remove the tree from its container and gently tease the roots if they're circling. Place the root ball on the soil mound, backfill with native soil, and tamp lightly to remove air pockets. The top of the root ball should sit 1-2 inches above ground level—this prevents water from pooling around the trunk.
Water deeply right after planting to settle the soil and eliminate air gaps. You'll want to apply about 1-2 gallons per tree to ensure the roots make full contact with the surrounding soil. Mulch with 2-3 inches of wood chips, keeping it clear of the trunk to prevent moisture buildup and rot.
🌿 Step 4: Maintain Through the First Growing Season
Water newly planted cedars once a week for the first 2-3 months, providing 1-2 gallons per tree each time. You'll know they need water when the top 2-3 inches of soil feel dry. Avoid overwatering—cedars hate soggy roots, which can lead to fungal diseases.
Fertilize lightly in early spring with a balanced, slow-release fertilizer (10-10-10). Too much nitrogen can make cedars grow too fast, leading to weak wood. Prune only to remove dead or crossing branches—cedars don't need heavy pruning to stay dense. Real talk: The first year is mostly about letting the roots establish before the tree puts energy into foliage growth.
⏰ Step 5: Monitor Growth and Adjust Care
After the first year, cedars typically need water only during prolonged dry spells. You'll see new growth in spring, and by year three, the screen should start filling in nicely. If branches look sparse, it might be a sign of underwatering or poor drainage—adjust your watering schedule accordingly.
Watch for pests like bagworms or spider mites, which can stress young cedars. A quick spray with horticultural oil in early summer usually keeps them in check. Here's the thing—cedars are low-maintenance once established, but the first few years set the foundation for a healthy, long-lasting privacy screen.
Tips & tricks for perfect cedar tree privacy fences
Here's what I've learned after planting and maintaining cedar screens for years—simple tricks that make all the difference.
Spacing Secret: That 4-6 foot spacing in Step 1 isn't just about mature width—it's about airflow. Too close, and you'll get fungal issues from poor circulation. I've seen screens planted 3 feet apart struggle with mold after just two years. Trust me, the extra space pays off in healthier growth and less maintenance.
Soil Prep Strategy: When you're digging those holes in Step 2, don't just mix compost or sand—create a "soil sandwich." Put a thin layer of your native soil at the bottom, then add your amended mix, then top with another layer of native soil. This helps prevent nutrient runoff while still giving roots the drainage they need. The mound technique you're already using is perfect for this.
Watering Wisdom: In Step 4, those 1-2 gallons per tree should go right at the base, not spread out. Use a watering wand or soaker hose to deliver water slowly to the root zone. I've seen people water from above and end up with fungal issues from wet foliage. Also, water in the morning—evaporation is lower, and trees have all day to absorb moisture before evening.
First-Year Focus: The key to long-term success is really in those first 2-3 months. Don't skip the weekly watering, even if it doesn't rain. I've seen cedars planted in drought conditions that never recovered because they weren't established properly. Think of this as an investment in your screen's future—healthy roots now mean a full, dense screen in just a few years.
Pro Tips for Cedar Tree Privacy Fence
- Here's what I've learned after planting and maintaining cedar screens for years—simple tricks that make all the diffe...
- Spacing Secret: That 4-6 foot spacing in Step 1 isn't just about mature width—it's about airflow. Too close, and you'...
- Soil Prep Strategy: When you're digging those holes in Step 2, don't just mix compost or sand—create a "soil sandwich...
Frequently asked questions
Got questions about creating a stunning cedar tree privacy fence? You’re not alone! Here are answers to the most common queries to help you plan with confidence.
How long does it take for a cedar tree privacy fence to fully grow?
A well-maintained cedar hedge typically reaches full privacy (6–8 feet tall) in 3–5 years. Faster-growing varieties like Leyland cedar can close gaps in just 2–3 years, while slower options like Thuja occidentalis may take longer. Regular pruning accelerates density!
Are cedar trees expensive compared to other privacy fence options?
Upfront costs vary: $2–$5 per plant for bare-root cedars vs. $10–$20+ for container-grown or pre-pruned hedges. However, cedars save money long-term by eliminating fencing materials, reducing noise/wind, and needing minimal upkeep. Pro tip: Bulk purchases or early spring planting often lower costs!
Do cedar trees handle harsh winters or coastal winds well?
Cedar trees are hardy in USDA Zones 3–9 and thrive in windy coastal areas (e.g., Leyland cedar resists salt spray). For extra protection, mulch the base in winter and water deeply before freeze. Warning: Avoid planting near driveways—cedars hate compacted soil!
How often should I prune a cedar privacy fence?
Prune twice yearly: Light shaping in spring (after new growth) and heavy trimming in late summer (before fall). Use sharp shears to avoid tearing branches. Pro tip: Wear gloves—cedar needles can irritate skin! For dense growth, thin out inner branches every 2–3 years.
What’s a good alternative if cedar trees don’t suit my climate?
Consider these low-maintenance privacy plants by region:
- Arborvitae (Thuja) – Cold-hardy, deer-resistant (Zones 4–8).
- Holly (Ilex) – Glossy leaves, berries for wildlife (Zones 5–9).
- Bamboo (Clumping) – Fast-growing, windbreak champion (Zones 5–11).
- Boxwood (Buxus) – Formal hedge, drought-tolerant (Zones 5–9).
For noise reduction, pair with evergreen shrubs like Juniper or Pittosporum.
Wrapping up and next steps
Installing a cedar tree privacy fence is a game-changer for your outdoor space—offering natural beauty, noise reduction, and wind protection while boosting curb appeal. These evergreen screens are low-maintenance, eco-friendly, and perfect for year-round privacy. 🌲✨
Ready to transform your yard? Start by sketching your design, gathering your tools, and reaching out to local nurseries for healthy cedar saplings. With patience and care, you’ll enjoy a lush, functional privacy screen for years to come!
Pro tip: Consider spacing your trees 3–5 feet apart for optimal growth and airflow.