
Pruning
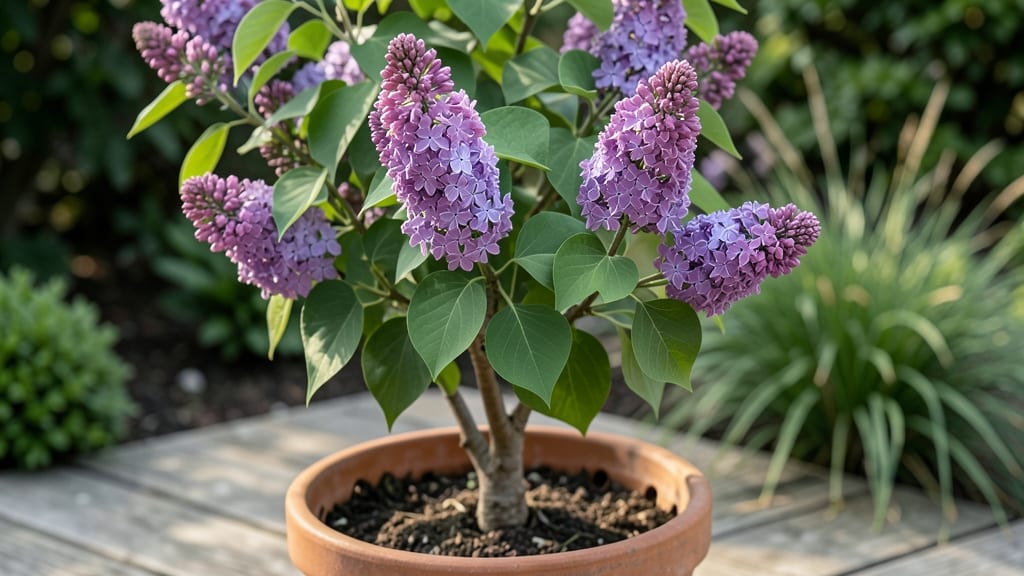
Growing a lilac tree in pot means enjoying fragrant spring blooms without the permanent yard commitment. 🌸 I’ve kept potted lilacs thriving for years by mastering the right container, soil, and pruning schedule—no fancy tools or green thumbs required.
The secret lies in balancing their love of space with their need for structure, and I’ll show you exactly how to do it.
Start with a 15-gallon or larger container (they need room for roots) and drainage holes—waterlogged roots are the #1 killer. Use a mix of potting soil, compost, and perlite (60/30/10 ratio) to keep moisture balanced but roots aerated.
Lilacs hate soggy feet but also dry out fast in summer, so check soil moisture weekly.
Pruning in late winter or early spring is where the magic happens. Cut back one-third of old wood to encourage new growth and more blooms next year. Feed with balanced fertilizer in early spring, then switch to low-nitrogen once buds form.
With these steps, your potted lilac will reward you with vibrant purple clusters for years.
Winter care is key—wrap the pot in burlap and move it to a sheltered spot if temps drop below 10°F. Watch for root-bound issues (check roots every 2 years) and divide congested plants in early spring. Potted lilacs aren’t just possible—they’re foolproof with the right care.
📚 In This Guide
- What you need
- Instructions
- Tips and common mistakes
- Wrapping up and next steps
What you need
- ● Pruning shears or secateurs: Sharp, clean, and bypass-style (for clean cuts). Example: Felco F-2 or Corona bypass pruners.
- ● Gloves: Heavy-duty, cut-resistant gloves (e.g., Fiskars or Southfork brands) to protect your hands from thorns.
- ● Disinfectant (70% isopropyl alcohol or bleach solution): 1 part bleach to 9 parts water for sterilizing tools between cuts.
- ● Rubbing alcohol or hand sanitizer: For cleaning hands after pruning.
- ○ Pruning saw (optional but helpful): For thicker branches (1–2 inches in diameter). Example: Fiskars pruning saw.
- ● Lilac tree in a pot: Ensure the pot has drainage holes (minimum 12–18 inches in diameter for mature trees).
- ○ Pruning sealant: (e.g., Tanglefoot Tree Wound Pruning Seal) to protect larger cuts (optional for lilacs, as they heal well on their own).
- ● Garden twine or zip ties: For securing branches if needed during pruning.
- ● Notebook & pen: To jot down pruning notes or track blooming cycles.
- ● Wheelbarrow or bucket: For collecting pruned branches and debris.
Step-by-Step guide for pruning potted lilacs
Here's how to keep your container-grown lilac thriving and blooming beautifully year after year.
✂️ Step 1: Understand Pruning Timing for Potted Lilacs
Prune your potted lilac right after flowering—typically in late spring or early summer. This timing ensures you don't cut off next year's blooms, which develop on old wood. I always wait until after the last flowers fade but before new growth hardens off. For container lilacs, which often bloom slightly later than in-ground plants, watch for at least 50% of flowers to drop before touching your shears.
If you prune too early, you risk removing flower buds that haven't opened yet. If you wait too long, you may encourage overly vigorous late-season growth that won't harden off properly before winter. The key is balance—cut when you see fresh green growth beginning on the stems but before it becomes woody.
✂️ Step 2: Remove Dead, Diseased, or Weak Wood
Start by removing any dead, diseased, or crossing branches first. I use clean, sharp pruners to make 45-degree cuts just above a leaf bud or lateral branch. For dead wood, cut back to healthy green tissue. Diseased branches should be removed completely and disposed of (don't compost them—they may harbor fungal spores). In containers, diseased wood spreads faster due to limited airflow, so be extra vigilant.
Look for branches that are thinner than a pencil or growing inward toward the center of the plant. These weak stems compete with stronger growth and reduce airflow, which invites pests. Remove them entirely at the base. This cleanup phase takes 10-15 minutes per plant and makes the rest of the pruning much easier.
✂️ Step 3: Shape the Plant and Encourage Fullness
Next, shape your lilac by cutting back 1/3 of the oldest stems to just above a healthy bud. I always choose the lowest buds on each stem to encourage bushier growth. For potted lilacs, which have more limited root systems, avoid cutting more than 1/3 of the total plant volume—this prevents stress. You'll see the plant naturally fill out from the base as new growth emerges from the lower buds.
For container-grown lilacs, I focus on creating an open, vase-like shape rather than a tight, rounded form. This shape improves airflow and sunlight penetration, which are critical for potted plants. Step back occasionally to visualize the plant's structure—you want to see light reaching the center where new growth will emerge.
💧 Step 4: Post-Pruning Care for Potted Lilacs
After pruning, give your lilac a deep watering to help it recover. Potted plants dry out faster, so I water until water runs freely from the drainage holes. Follow up with a balanced fertilizer (10-10-10) applied at half strength to support new growth. Avoid heavy fertilizing immediately after pruning—it can stress the plant as it recovers.
Place your potted lilac in a bright, sheltered spot for 2-3 weeks to minimize stress. Watch for new growth emerging from the pruned areas—this confirms the plant is responding well. If you notice yellowing leaves or wilting, it's a sign of over-pruning or underwatering. Adjust care accordingly, but don't panic—potted lilacs are resilient once they establish new growth.
⏰ Step 5: Winter Preparation for Container Lilacs
In late fall, reduce watering and stop fertilizing to prepare your potted lilac for dormancy. Wrap the pot in burlap or bubble wrap to protect roots from freezing temperatures, especially if you're growing in a colder climate. I also add a 2-inch layer of mulch around the base to insulate the soil. For container lilacs, which are more vulnerable to temperature swings, this extra protection makes a noticeable difference in spring recovery.
Move the pot to a protected location (like against a north-facing wall) where it won't be exposed to harsh winds. Check the soil moisture occasionally—it should be slightly dry to the touch but not bone-dry. Overwatering in winter can lead to root rot, especially in containers where drainage is critical. With proper winter care, your potted lilac will burst into bloom again next spring.
Tips & tricks for perfect potted lilac pruning
Here's what nobody tells you about keeping your container lilac looking its best—these tricks will save you from common pruning pitfalls.
Timing Secret: The 50% flower drop rule in Step 1 is your best friend. I've learned this the hard way—waiting until all flowers fade can mean cutting off next year's blooms before they form. Mark your calendar after the first big bloom wave and check daily for that 50% threshold. Container lilacs often bloom later than ground plants, so don't rush—patience here means more flowers next season.
Tool Technique: Your pruners are only as good as their sharpness. I can't stress this enough: dull blades crush stems instead of making clean cuts, which invites disease. Before you start, test your pruners on a small branch—if it tears rather than cuts cleanly, sharpen them. For container lilacs, I also recommend using bypass pruners (the scissor-style) rather than anvil pruners, which can crush delicate stems and reduce airflow in your already compact plant.
Visual Cue for Step 3: When shaping your lilac in Step 3, imagine you're creating a bird's nest rather than a tight ball. The open vase shape improves airflow and sunlight penetration—critical factors for potted plants. From your vantage point, you should be able to see light reaching the center where new growth will emerge. If you can't see daylight through the center, you've cut too aggressively. Remember, we're removing just 1/3 of the oldest stems, not trying to defoliate the plant.
Winter Care Insight: That 2-inch layer of mulch in Step 5 isn't just decoration—it's insulation. In containers, roots are more exposed to temperature swings than in-ground plants. I've seen potted lilacs survive winter just fine with proper mulching, even in Zone 5 climates where ground lilacs would struggle. The mulch creates a microclimate that protects those delicate roots from freezing and thawing cycles that can damage container plants.
Pro Tips for Lilac Tree In Pot
- Here's what nobody tells you about keeping your container lilac looking its best—these tricks will save you from common pruning pitfalls.
- Timing Secret: The 50% flower drop rule in Step 1 is your best friend.
- Tool Technique: Your pruners are only as good as their sharpness.
Frequently asked questions
Got questions about keeping your lilac tree thriving in a pot? Here are some of the most common ones—and their answers!
Can a lilac tree grow well in a pot long-term?
A lilac tree can thrive in a pot for years, but it needs the right conditions. Choose a large, well-draining container (at least 20 gallons) and upgrade the pot size every 3–4 years. Dwarf varieties like Katherine Havemeyer or Miss Kim adapt best. Just remember: potted lilacs may bloom less vigorously than in-ground plants due to root restrictions.
When is the best time to prune a potted lilac for blooms?
Prune your lilac right after flowering (late spring to early summer) to encourage next year’s blooms. Avoid heavy pruning in fall or winter—this can remove next season’s flower buds. For container lilacs, a light shaping trim in early spring (before buds swell) also helps maintain their form.
How often should I water a lilac tree in a pot?
Potted lilacs dry out faster than in-ground plants. Water deeply when the top 1–2 inches of soil feel dry (usually every 5–7 days in summer, less in winter). Empty the saucer after watering to prevent root rot. Mulch the soil surface to retain moisture, but keep it 2–3 inches away from the trunk.
What’s the best alternative if my lilac struggles in a pot?
If your lilac’s growth slows or blooms fade, consider these potted alternatives with similar fragrance and beauty:
- Mock Orange (Philadelphus) – Compact, fragrant, and thrives in containers.
- Dwarf Lilac (Syringa meyeri) – Smaller size, hardy, and prolific bloomer.
- Weigela – Fast-growing, colorful blooms, and adaptable to pots.
Why are my potted lilac leaves turning yellow or dropping?
Yellow leaves or leaf drop often signal overwatering, poor drainage, or nutrient deficiencies. Check for:
- Root rot: Let soil dry out between waterings and ensure the pot has drainage holes.
- Nutrient lack: Fertilize in early spring with a balanced, slow-release fertilizer (10-10-10).
- Pests: Inspect for aphids or spider mites—spray with neem oil if needed.
Wrapping up and next steps
Growing a lilac tree in a pot is a rewarding way to enjoy fragrant blooms year-round—with the right pruning techniques! Remember, timing, tools, and technique are your best friends, whether you’re shaping for aesthetics or encouraging lush regrowth.
With patience and care, your potted lilac will thrive and reward you with seasonal beauty.
Ready to take the next step? Start small—pick one pruning task this week, like removing dead branches or shaping your tree. Before you know it, your lilac will be the star of your patio! 🌸✂️