
Pruning
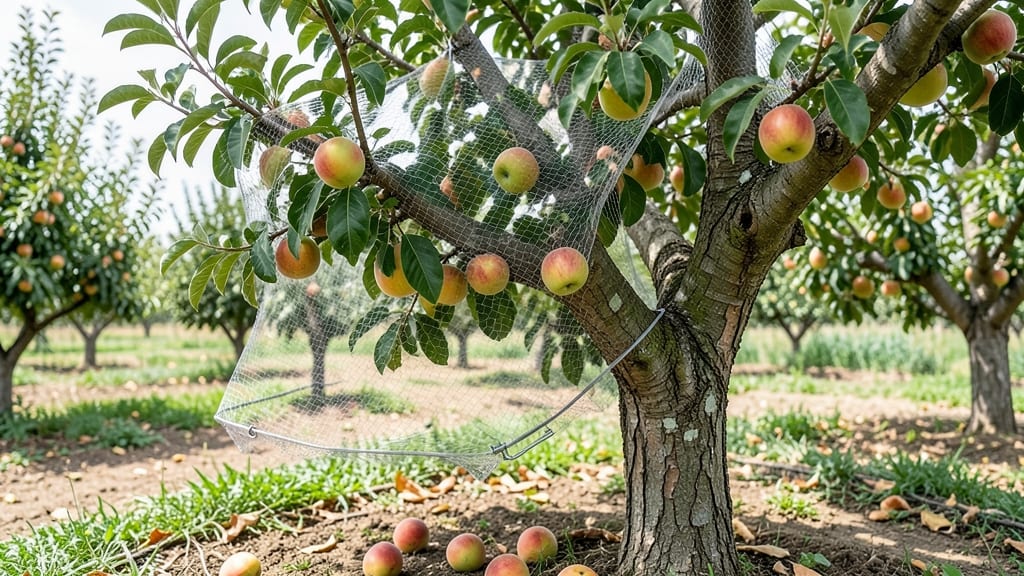
My fruit tree net catchers saved my entire peach harvest last summer from wasps and birds. 🌱 These lightweight mesh barriers are the unsung heroes of backyard orchards, preventing pests from turning your fruit into a buffet.
The right net has a 1/4-inch mesh to block pests while allowing sunlight and air to reach the fruit. Look for UV-resistant materials that won’t degrade after a season of sun exposure. I use 6-foot-tall nets for my dwarf trees, which are easy to secure with stakes or weights.
Proper installation means no gaps at the bottom or top—pests are sneaky! Wrap the net snugly around the trunk and secure it with twist ties or zip ties. Check weekly for tears and repair them immediately to maintain effectiveness. For smaller trees or container-grown fruit, consider individual fruit bags instead.
These work well for delicate varieties like cherries or figs where nets might be impractical. The key is protecting your harvest without smothering the tree.
📚 In This Guide
- What you need
- Instructions
- Tips and common mistakes
- Wrapping up and next steps
What you need
- ● Lightweight mesh netting – 10–20 ft² (choose fine-mesh, UV-resistant, and durable material like polyethylene or polypropylene for best results).
- ● Measuring tape – 10–25 ft (for precise sizing).
- ● Scissors or heavy-duty utility knife – For cutting mesh cleanly.
- ● Zip ties or plastic ties – 10–20 pieces (to secure the netting to branches).
- ● Soft cloth or gloves – To protect hands while handling mesh or branches.
- ● Ladder or step stool – For reaching higher branches safely.
- ● Staple gun with heavy-duty staples – Alternative to zip ties for securing edges.
- ● Marking chalk or fabric marker – To outline cuts or measurements before cutting.
- ● Spray bottle with water – Helps dampen mesh for easier handling.
Step-by-Step guide to installing fruit tree net catchers
Here's how I protect my harvest without stressing the tree—simple, effective, and foolproof.
🪴 Step 1: Measure and Select the Right Net Size
Start by measuring your tree's canopy width from tip to tip. Add 6-12 inches to that measurement—this extra space ensures the net hangs freely without touching the trunk or branches. For most standard fruit trees, a 10-foot by 10-foot net works perfectly for a mature tree. If your branches extend beyond that, opt for a larger size or connect multiple nets with zip ties or clothespins.
Check the net's mesh size too—½-inch to 1-inch holes are ideal. Smaller holes trap more fruit but can snag branches, while larger holes let some fruit slip through. I always choose ¾-inch mesh as a happy medium. Hold the net up to your tree and visualize how it will drape over the canopy.
☀️ Step 2: Install Support Stakes or a Frame
Before draping the net, set up support to keep it taut and prevent sagging. Drive 4-6 wooden stakes (or metal T-posts) around the tree's perimeter, about 3 feet outside the canopy. For small trees, 3 stakes work; for larger ones, add a fourth on the windward side. Hammer them in until they stand 2 feet deep—this keeps them stable in wind or rain.
For extra support, create a simple frame by tying thin branches or PVC pipes between the stakes at the top. This raises the net slightly above the tree, preventing fruit from getting crushed. I use zip ties to connect the frame pieces—cheap, strong, and easy to adjust later.
🌿 Step 3: Drape and Secure the Net
Lay the net over the frame so it drapes evenly across the tree. Start at the top and let it cascade down like a hammock. Make sure the net covers 100% of the canopy—even small gaps let fruit escape. For trees with dense branches, tuck the net into the inner canopy gently to avoid damaging tender shoots.
Secure the net to the stakes using clothespins, bungee cords, or heavy-duty rubber bands. I prefer clothespins because they grip tightly without cutting the mesh. Check for even tension—the net should sag slightly in the middle but not drag on the ground. If it’s too loose, tighten it gradually until it sits just above the lowest branches.
✂️ Step 4: Adjust and Maintain Through the Season
After installation, give the net a gentle shake to settle it over the branches. Watch for hot spots where fruit piles up—these spots can rot if left unchecked. Every 2-3 weeks, redistribute the fruit by carefully lifting sections of the net and shaking them out. This prevents overcrowding and improves air circulation.
Check the net’s condition after heavy rain or wind. If it sags or tears, tighten it again or patch small holes with duct tape or mesh repair strips. At harvest time, remove the net 1-2 days before picking to let the fruit firm up slightly—this makes it easier to handle without bruising.
🔄 Step 5: Store or Reuse the Net for Next Year
Once harvest is complete, remove the net and give it a thorough cleaning with a hose or mild soap and water. Rinse well to remove any pesticide residues or mold spores. Let it dry completely in the sun—this kills any lingering pests or diseases. I hang mine on a clothesline or fold it neatly in a plastic bin for storage.
If the net shows signs of wear (frayed edges, large holes), replace it before next season. A well-maintained net lasts 3-5 years, saving you money and hassle. Label your storage bin with the year and tree type—next spring, you’ll be ready to protect your harvest in minutes.
Tips & tricks for perfect fruit tree net installation
These simple tricks will help you avoid common mistakes and get the most out of your fruit protection setup.
Net Size and Mesh Matters: When measuring your tree's canopy in Step 1, don't just eyeball it—use a tape measure for accuracy. The extra 6-12 inches isn't just for clearance; it accounts for the net's natural sag when loaded with fruit. For trees with irregular shapes, consider measuring the longest diameter first, then the perpendicular width, and choose a net that covers both dimensions. The ¾-inch mesh is perfect because it catches most fruit while allowing enough airflow to prevent rot in hot spots.
Stake Placement Strategy: In Step 2, I've learned the hard way that placing stakes too close to the tree can damage roots when you're tightening the net. Always position them at least 3 feet from the trunk. For windy areas, add an extra stake on the windward side—this prevents the net from flapping dangerously. If you're using metal T-posts, drive them at a slight angle (about 10 degrees) for better stability in high winds.
Tension Technique: The even tension in Step 3 is everything—too tight and you risk damaging branches, too loose and fruit will escape. Here's my trick: After draping the net, walk around the tree and gently pull each corner upward. The net should lift slightly but not rip. If you're using clothespins, place them at regular intervals (about every 3 feet) to distribute the weight evenly. For extra durability, I reinforce the corners with additional clothespins or small bungee cords.
Maintenance Shortcuts: Don't let the 2-3 week redistribution in Step 4 become a chore. Set a reminder on your phone for every 21 days—right when you're checking your garden anyway. For quick repairs, keep a small roll of duct tape in your gardening toolbox. I've found that patching small holes immediately prevents them from growing larger. And that 1-2 day pre-harvest removal? It's worth it—your fruit will be firmer and easier to handle when you're ready to pick.
Pro Tips for Fruit Tree Net Catcher
- These simple tricks will help you avoid common mistakes and get the most out of your fruit protection setup.
- Net Size and Mesh Matters: When measuring your tree's canopy in Step 1, don't just eyeball it—use a tape measure for accuracy.
- Stake Placement Strategy: In Step 2, I've learned the hard way that placing stakes too close to the tree can damage roots when you're tightening the net.
Frequently asked questions
Got questions about fruit tree net catchers?
You’re not alone! Here are answers to the most common concerns—from installation to troubleshooting—to help you protect your harvest with ease.
What’s the best time of year to install a fruit tree net catcher?
Install your net before fruits form—typically in early spring (just after blooms fall) or late winter. This ensures pests like birds or squirrels can’t access young fruit. For late-season crops (e.g., apples), reapply after harvest if needed. Pro tip: Check local pest cycles for timing tweaks!
How do I choose the right mesh size for my fruit tree?
Mesh size depends on your biggest pest threat:
- Birds: Use
1/2"–3/4"mesh (stops most species). - Squirrels/raccoons: Opt for
1"–1.5"mesh (denser = better protection). - Insects (e.g., codling moths):**
1/4"–1/2"mesh works well.
Always check the product specs—smaller holes mean more coverage but may reduce airflow slightly.
What if my fruit tree net gets torn or damaged?
Patch small tears with duct tape or heavy-duty repair patches (avoid plastic tape—it degrades in sunlight). For larger holes, replace the entire section or net. Quick fix: Secure loose edges with __PROTECT_3 or PROTECT_4__ temporarily while you shop for a replacement.
Are there cheaper alternatives to commercial fruit tree nets?
Yes! DIY options include:
- Poultry netting: Budget-friendly but may require more frequent repairs.
- Row covers: Lightweight fabric (like
frost cloth) for small trees—though less durable. - Burlap sacks: Hang over branches to deter birds (less effective for larger pests).
For long-term use, commercial nets offer durability and UV resistance—worth the investment for heavy harvests!
Will a fruit tree net affect my fruit’s growth or flavor?
Not at all! Nets provide physical protection without chemicals or sunlight blockage. Some gardeners note slightly cleaner fruit (less pest damage = fewer bruises), but flavor and growth remain unchanged. Just ensure proper airflow to avoid humidity-related issues (like mold).
Wrapping up and next steps
Investing in a fruit tree net catcher is a simple yet game-changing way to protect your hard work and maximize your harvest. Whether you're dealing with birds, squirrels, or wind damage, these lightweight mesh solutions offer an easy, cost-effective fix that keeps your fruit safe and your trees thriving. 🌳🍎
Ready to take action? Start by measuring your trees and choosing the right size—then grab your net catcher and watch your harvest grow with confidence! Your future fruit bounty will thank you.