
Pruning
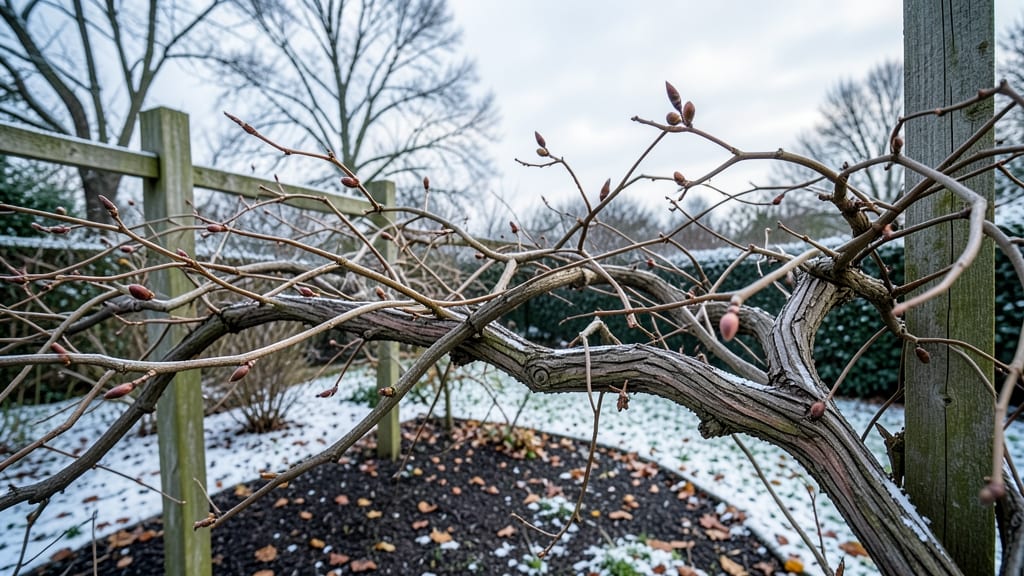
Winter is the perfect time to revive your wisteria tree's spring blooms—strategic pruning now determines next year's floral display. 🌿 I've learned that cutting back now, while the tree is dormant, prevents disease and encourages stronger growth.
The key is timing: prune after the first hard frost but before new buds swell in late winter.
You'll need sharp pruning shears, a ladder (if needed), and a bucket for clippings. Focus on removing dead, crossing, or weak branches first—this opens the canopy to sunlight and air.
Wisteria blooms on old wood, so avoid heavy pruning of last year's growth unless absolutely necessary. A 20-30% reduction of the total canopy is ideal for winter maintenance.
After pruning, protect your tree from harsh winds by wrapping the trunk with burlap or using tree guards. Mulch around the base with 2-3 inches of organic material to insulate roots.
Winter watering is crucial—give the tree a deep soak once a month if rainfall is scarce. This keeps roots hydrated without encouraging rot.
Come spring, you'll see new growth emerging from the pruned branches, and those buds will burst into vibrant blooms. The secret is patience—wisteria trees reward careful winter care with years of stunning, fragrant flowers.
Keep an eye out for signs of stress, like yellowing leaves or oozing sap, and adjust your approach accordingly.
📚 In This Guide
- What you need
- Instructions
- Tips and common mistakes
- Wrapping up and next steps
What you need
- ● Pruning shears: Bypass pruners with sharp, sterilized blades (e.g., Felco F-2 or similar). Quantity: 1 pair (or 2 if working on a large tree).
- ● Loppers: Heavy-duty, long-handled loppers (20–24 inches) for thicker branches (1–2 inches in diameter). Example: Corona or Fiskars.
- ● Pruning saw: A curved-tooth pruning saw for branches thicker than 2 inches. Example: Bahco or Fiskars.
- ● Gloves: Heavy-duty, cut-resistant gardening gloves (e.g., Mechanix or Dr. Soldo). Quantity: 1 pair.
- ● Disinfectant: 70% isopropyl alcohol or a bleach solution (1 part bleach to 9 parts water) to sterilize tools between cuts.
- ○ Pruning sealant: Optional but recommended for large cuts (e.g., Tanglefoot Tree Wound Pruning Seal). Quantity: Small jar.
- ● Ladder: Sturdy, extendable ladder (16–20 feet) if your wisteria is tall. Safety note: Use a ladder stabilizer for extra security!
- ● Trash bags or bucket: For collecting pruned branches. Quantity: 1–2 large bags or a 5-gallon bucket.
- ● Weather check: Prune on a dry, calm day (avoid frost or rain).
- ● Safety glasses: Protect your eyes from debris. Example: Oakley or generic gardening goggles.
- ● Long sleeves/pants: Wear protective clothing to avoid scratches from thorns.
- ● First-aid kit: Basic kit with bandages and antiseptic for minor cuts.
- ● Notebook & pen: To sketch a simple pruning map of your tree’s structure before you start.
Step-by-Step instructions for pruning wisteria in winter
Winter’s the perfect time to prune wisteria—here’s how to shape it for stunning spring blooms.
✂️ Step 1: Wait for Dormancy and Choose the Right Tools
Prune wisteria only after the leaves have fallen completely and before new growth begins—typically between late winter and early spring when temperatures stay below 40°F. I use sharp bypass pruners for clean cuts and a loppers for thicker branches. Disinfect your tools with rubbing alcohol to prevent spreading disease between cuts.
Real talk: Don’t prune in fall or early winter. You’ll encourage new growth that won’t survive frost, and wisteria needs its energy stored for spring blooms. Wait until the ground is still frozen—this is your signal dormancy is deep.
✂️ Step 2: Remove Dead, Weak, or Crossing Branches
Start by inspecting the tree for dead wood (brown, brittle branches) or weak growth (thin, leggy stems). Cut these back to the main trunk or a healthy bud. Next, look for branches crossing or rubbing against each other—they’ll create wounds and invite disease. Remove one of the crossing branches entirely, cutting just above a bud facing outward to encourage an open shape.
Here’s the thing—wisteria grows aggressively, so I never leave stubs. Always cut back to a 45-degree angle about ¼ inch above a bud. This ensures new growth emerges in the right direction and heals faster. If a branch is thicker than your wrist, use your loppers and make the cut on the outside of the branch collar.
✂️ Step 3: Thin Out Overcrowded Areas
Wisteria blooms on old wood, so avoid heavy pruning—focus on thinning instead. Look for clusters of branches growing too close together and remove every other branch, starting with the smallest. This improves airflow and sunlight penetration, which prevents fungal issues and encourages stronger blooms next season.
You’ll know you’re doing it right when you can see light filtering through the center of the tree. If you’re unsure, step back and take a photo—comparing before and after helps visualize the open structure you’re creating. Never remove more than one-third of the tree’s foliage in a single year.
✂️ Step 4: Shape for Airflow and Light
Wisteria thrives when its branches grow outward rather than inward. Look for suckers (vigorous shoots growing from the base or trunk) and prune them back to the main stem. For established trees, I shape by selectively shortening the longest branches to encourage a balanced, rounded form. Cut just above a bud that faces the direction you want growth to go—this is key for training the tree’s structure.
Don’t skip this step. Wisteria left unshaped becomes a tangled mess, and blooms suffer from poor airflow. I like to visualize the tree as an umbrella—wide at the top, open in the middle, and supported by strong branches. After pruning, clean up any fallen debris and apply a 2-3 inch layer of mulch around the base to retain moisture and protect roots.
🌱 Step 5: Monitor and Prepare for Spring
Once pruning is done, water the tree deeply if winter has been dry. Wisteria roots need moisture to recover from the stress of pruning. Watch for new buds in early spring—they’ll swell and turn green, signaling the tree is ready for growth. Avoid fertilizing immediately after pruning; wait until you see fresh growth before applying a balanced fertilizer (like 10-10-10) in early spring.
Here’s what I do next: I mark the pruned areas with small flags or a garden marker to track growth over the season. If you notice any bleeding sap from cuts, don’t worry—it’s normal and won’t harm the tree. Just keep an eye out for signs of stress like yellowing leaves or wilting, which could indicate over-pruning or disease.
Tips & tricks for perfect winter wisteria pruning
Don't let winter pruning overwhelm you—these key strategies will help you shape your wisteria like a pro.
Timing is Everything: The 40°F temperature guideline in Step 1 is your golden window. I check the ground temperature with a thermometer if I'm unsure—frozen soil means dormancy is deep and safe. If you miss this window, you risk encouraging tender new growth that won't survive late frosts. Confession: I skipped this once and ended up with frost-damaged buds the following spring.
Cutting Technique Matters: That 45-degree angle and ¼-inch above the bud in Step 2 isn't just technical jargon—it's what creates strong new growth. I use a small paint marker to flag the bud direction before cutting. For thicker branches, I make the cut on the outside of the branch collar to prevent tearing. Don't make the mistake of cutting too close to the trunk—this creates wounds that take forever to heal.
Visualizing the Structure: Step 4's "umbrella" analogy works perfectly. I actually sketch a simple diagram before starting—draw the tree's current shape and mark where I want branches to grow. This helps me visualize the open center we're creating. For established trees, I never remove more than one-third of the foliage in one year, even if it feels like there's too much to cut.
Post-Pruning Care: That 2-3 inch layer of mulch in Step 4 isn't just decorative—it's insulation. I use shredded bark mulch because it breaks down slowly and improves soil structure over time. After pruning, I always water deeply (about 1-2 gallons) to help the tree recover from the stress of cutting.
Pro Tips for Wisteria Tree In Winter
- Don't let winter pruning overwhelm you—these key strategies will help you shape your wisteria like a pro.
- Timing is Everything: The 40°F temperature guideline in Step 1 is your golden window.
- Cutting Technique Matters: That 45-degree angle and ¼-inch above the bud in Step 2 isn't just technical jargon—it's what creates strong new growth.
Frequently asked questions
Got questions about keeping your wisteria tree thriving through winter? Here are some of the most common concerns—and how to tackle them!
When is the best time to prune wisteria in winter?
Prune your wisteria after the first hard frost but before new growth starts in late winter (typically February or early March). This timing ensures you remove dead wood while avoiding early spring buds. Avoid pruning in extreme cold—wait for temperatures above 20°F (-7°C) to prevent shock.
Will pruning wisteria in winter kill it?
No—if done correctly! Wisteria is hardy and can handle winter pruning, but avoid over-pruning (never remove more than 1/3 of the plant at once). Focus on dead, weak, or crossing branches first. Just be gentle: wisteria heals slower in cold weather, so sharp tools and clean cuts are a must!
What if my wisteria doesn’t bloom after winter pruning?
Lack of blooms often means too much pruning or cutting back old wood (where flowers form). Always leave last year’s growth—prune only new, vigorous shoots to encourage next year’s blooms. If your tree is young (<3 years), be patient—wisteria blooms best after 3–5 years of growth.
Can I prune wisteria in late winter if I missed the ideal time?
Yes, but act quickly! If you miss the late-winter window, prune as soon as new buds swell (early spring). Just avoid heavy pruning after March—this can delay blooming. If you’re late, focus on shaping and thinning rather than aggressive cuts to minimize stress.
Are there winter alternatives if I can’t prune now?
If winter pruning isn’t feasible, light maintenance helps! Remove dead wood anytime, and thin out dense growth in early spring. For aggressive pruning, wait until late spring (May–June), but expect fewer blooms that year. Mulch the base now to protect roots—wisteria hates frozen soil!
What’s the biggest mistake people make pruning wisteria in winter?
The top mistake? Pruning too late or cutting back all growth. Wisteria blooms on old wood, so never remove last year’s stems. Another pitfall? Using dull tools, which tear bark and invite disease. Always sanitize shears with rubbing alcohol and make clean, angled cuts just above a bud.
Wrapping up and next steps
Winter is the perfect time to give your wisteria tree the care it needs to burst into vibrant spring blooms! By mastering strategic pruning—cutting back old wood, shaping for airflow, and encouraging new growth—you’re setting the stage for a stunning floral display.
Remember, patience and precision are key, but the reward is worth the effort.
Ready to transform your wisteria into a showstopper? Grab your pruners, roll up your sleeves, and start planning your winter pruning session today! Your future blooms will thank you. 🌸✂️