
Pruning
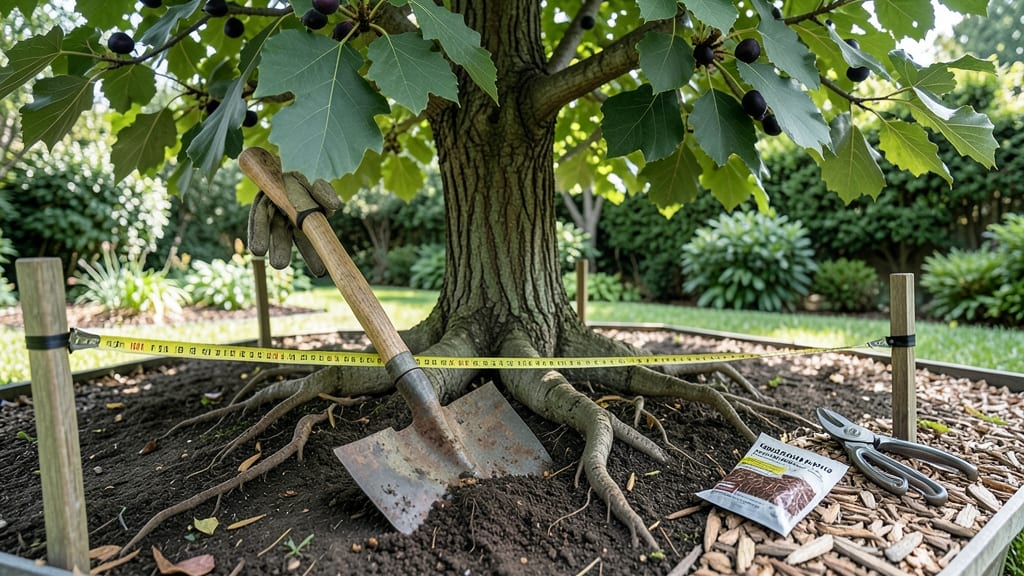
Mulberry tree roots pictures reveal just how aggressively they spread—even in well-maintained yards. 🌱 I’ve seen them crack sidewalks and outcompete lawns within just a few seasons, but with the right approach, you can keep them in check while keeping your tree thriving.
The key lies in understanding their natural habits: shallow, wide-reaching roots that love moisture and can send up shoots miles from the trunk if left unchecked.
Think of mulberry roots like a hungry vine—they’ll seek out water and nutrients, often popping up where you least expect them. A mature tree’s roots can extend 15–25 feet from the trunk, and their depth rarely goes below 24 inches, which is why they’re so prone to surface damage.
The good news? Strategic pruning and barriers can redirect their growth before they become a problem.
By pruning roots strategically—cutting back aggressive suckers in early spring and installing root barriers at the drip line—you’ll encourage deeper root growth while preventing sidewalk invasions. The result? A healthier, more contained tree that still produces those sweet berries without turning into a landscaping nightmare.
This method works for both young saplings and established trees, and it’s especially useful if you’re dealing with black mulberry (the most invasive variety) or red mulberry (a bit more manageable). Let’s get into the step-by-step so you can take control before your lawn does.
📚 In This Guide
- What you need
- Instructions
- Tips and common mistakes
- Wrapping up and next steps
What you need
- ● Pruning shears: Sharp, bypass pruners (for small roots, 6-8 inches in length)
- ● Loppers: Heavy-duty, bypass type (for thicker roots, 12-18 inches in length)
- ● Pruning saw: Curved-tooth saw (for roots thicker than 2 inches in diameter)
- ● Gloves: Heavy-duty, cut-resistant (to protect hands from sharp roots and debris)
- ● Knee pads or a small stool: For comfort while working close to the ground
- ● Disinfectant: 70% isopropyl alcohol or a bleach solution (1 part bleach to 9 parts water) for sterilizing tools
- ○ Pruning sealant (optional but recommended): Tree wound sealant (for large cuts to prevent disease)
- ● Garden hose or water source: To clean tools and rinse roots after pruning
- ● Trash bags or compost bin: For disposing of pruned roots and debris
- ● Root stimulator: Mycorrhizal fungi or rooting hormone (to encourage regrowth)
- ● Measuring tape: For tracking root diameter and spacing
- ● Camera or smartphone: To document before and after pruning (for reference or sharing with friends!)
- ● Safety glasses: To protect eyes from debris
- ● Mulch: Organic mulch (e.g., wood chips or straw) to cover the area post-pruning
Step-by-Step guide to pruning mulberry tree roots for optimal health
Healthy mulberry roots mean vigorous growth above ground—here's how to prune them like a pro.
🌱 Step 1: Assess Root System and Identify Problem Areas
Start by examining the root zone carefully. Mulberry trees develop aggressive root systems that can encroach on sidewalks, driveways, or neighboring plants. Look for roots thicker than ½ inch—these are structural roots that need protection, while thinner roots can be safely pruned. I recommend digging a 12-inch wide trench around the tree's drip line (the edge of its canopy) to expose the roots clearly.
Focus on roots growing horizontally or upward—these are the most likely to cause damage. Healthy roots should be white or light tan on the outside with a firm texture. Dark, mushy roots indicate rot and should be removed entirely. Mark problem areas with stakes and string to visualize the pruning plan before making any cuts.
✂️ Step 2: Prune Aggressive Roots Using Proper Technique
Use a sharp pruning saw or root pruner to make clean cuts at a 45-degree angle, which helps water run off and prevents rot. Never tear roots—this creates jagged wounds that invite disease. For roots thicker than 1 inch, cut in stages over 2-3 years to avoid shocking the tree. I like to prune no more than 10-15% of the root system in a single session.
Focus on roots growing toward structures or competing with other plants. Leave 6-8 inches of root attached to the tree for each cut—this maintains the tree's stability. Water the tree deeply after pruning to help it recover. You'll see new root growth within 4-6 weeks if the tree is healthy.
💧 Step 3: Mulch and Protect the Root Zone
Apply a 3-inch layer of organic mulch (like wood chips or shredded bark) around the base of the tree, keeping it 6 inches away from the trunk to prevent rot. Mulch helps regulate soil temperature and retains moisture while suppressing weeds that compete with the tree's roots. Replenish the mulch annually to maintain its thickness.
For newly pruned roots, consider installing a root barrier if the tree is near hardscapes. Use ½-inch thick corrugated plastic buried 12-18 inches deep along the property line. This prevents future root intrusion while still allowing water and air to reach the roots. Monitor the tree for 3-4 weeks after mulching—healthy roots will show new growth at the edges of the pruned areas.
☀️ Step 4: Monitor and Maintain Root Health Long-Term
Check the pruned roots every spring and fall for signs of regrowth or new aggressive roots. If you notice roots pushing through the mulch or barrier, prune them immediately before they thicken. Mulberry trees are fast growers, so regular maintenance keeps them under control. I also recommend deep watering every 10-14 days during dry spells to encourage strong root development.
Fertilize lightly in early spring with a balanced, slow-release fertilizer (10-10-10) to support root recovery. Avoid heavy applications—mulberry trees are adaptable and don’t need rich soil to thrive. Over-fertilizing can lead to excessive top growth at the expense of root health. Watch for leaf yellowing or wilting after pruning—this could signal stress, and you may need to adjust your watering or mulching approach.
Tips & tricks for pruning mulberry tree roots
These practical insights will help you maintain mulberry root health while avoiding common mistakes that can stress your tree.
Visual Assessment: When examining roots in Step 1, look for the "white-to-tan" color as your guide—roots with brown or black streaks are often compromised. I've learned to use a small trowel to gently scrape away soil from the root surface for a clearer view. This helps distinguish between healthy fibrous roots and problematic ones that need removal. Remember, the goal is to preserve the tree's stability while controlling aggressive growth.
Cutting Technique: The 45-degree angle in Step 2 isn't just about aesthetics—it creates a larger surface area for the root to heal and prevents water pooling that could cause rot. For thicker roots over 1 inch, I recommend making the first cut about 6 inches from the tree trunk, then waiting 12 months before addressing the remaining root. This gradual approach mimics natural root dieback and reduces shock to the tree.
Mulch Application: The 3-inch mulch layer in Step 3 should extend to the tree's drip line, not just the trunk area. I've found that using coarse wood chips works better than fine mulch because they allow better airflow to the roots while still suppressing weeds. For newly planted mulberries, consider a 4-inch layer initially—young trees need extra protection from temperature fluctuations.
Long-Term Monitoring: When checking roots in Step 4, pay special attention to any roots growing through cracks in concrete or pavement. These often indicate a more extensive underground system. I've had success using a simple string line to mark the boundary of the root zone, which helps visualize where new growth is occurring. This visual reference makes it easier to spot and address problem areas before they become major issues.
Pro Tips for Mulberry Tree Roots Pictures
- These practical insights will help you maintain mulberry root health while avoiding common mistakes that can stress your tree.
- Visual Assessment: When examining roots in Step 1, look for the "white-to-tan" color as your guide—roots with brown or black streaks are often compromised.
- Cutting Technique: The 45-degree angle in Step 2 isn't just about aesthetics—it creates a larger surface area for the root to heal and prevents water pooling that could cause rot.
Frequently asked questions
Got questions about mulberry tree roots? We’ve got answers! Whether you’re curious about pruning timing, root behavior, or how to handle invasive roots, here’s what you need to know:
How deep do mulberry tree roots grow?
Mulberry tree roots typically spread wide (up to 30 feet from the trunk) but don’t grow extremely deep—usually 3–5 feet. However, they can be aggressive, so monitor for encroachment into sidewalks or foundations. If roots become problematic, targeted pruning (like root collar excavation) can help. Pro tip: Mulch heavily around the base to encourage healthier surface roots.
When is the best time to prune mulberry tree roots?
The ideal time to prune roots is late winter or early spring (before new growth starts) or fall (after leaf drop). Avoid pruning during extreme heat or drought, as stressed roots heal slower. If you’re dealing with invasive roots, summer pruning (with proper hydration) can also work—but prioritize timing when the tree isn’t actively fruiting.
What do I do if mulberry roots are damaging my driveway or foundation?
If roots are causing cracks or lifting, do not prune them yourself—call a certified arborist. They’ll assess whether root severing (cutting roots 6+ inches from the trunk) or soil barriers (like root barriers) are needed. For minor issues, deep watering or mulching can redirect growth. Warning: Over-pruning roots can weaken the tree.
Can I grow mulberry trees near other plants?
Mulberry trees are notoriously invasive—their roots and surface spread can choke out nearby plants. Give them at least 30–50 feet of space from other trees, shrubs, or gardens. If space is limited, opt for dwarf varieties (like ‘Illinois Everbearing’) or plant them in large containers (though they’ll still need root pruning).
What’s the difference between pruning mulberry roots vs. branches?
Pruning roots requires sterilized tools (to prevent disease) and careful cuts 6+ inches from the trunk—never more than 25% of the root system at once. Branch pruning, however, focuses on removing dead/diseased wood and shaping the canopy. Roots heal slower, so timing and sanitation are critical. Pro tip: Seal large root cuts with root pruning sealant to speed recovery.
Still unsure? Snap a photo of your mulberry’s roots or issues and compare it to our root pruning guide for visual clues!
Wrapping up and next steps
Understanding mulberry tree roots pictures and mastering pruning techniques is your first step toward nurturing a thriving, productive mulberry tree! 🌱 By keeping roots healthy and managing growth thoughtfully, you’ll ensure strong harvests and long-term vitality. Ready to put your new skills into action?
Start by observing your tree weekly—look for signs of stress, overgrowth, or root exposure. If you’re feeling bold, try pruning a small section first to build confidence.
For deeper insights, explore local gardening forums or consult a horticulturist to tailor your approach. Happy pruning—your mulberry tree will thank you! 🌿