
Tools
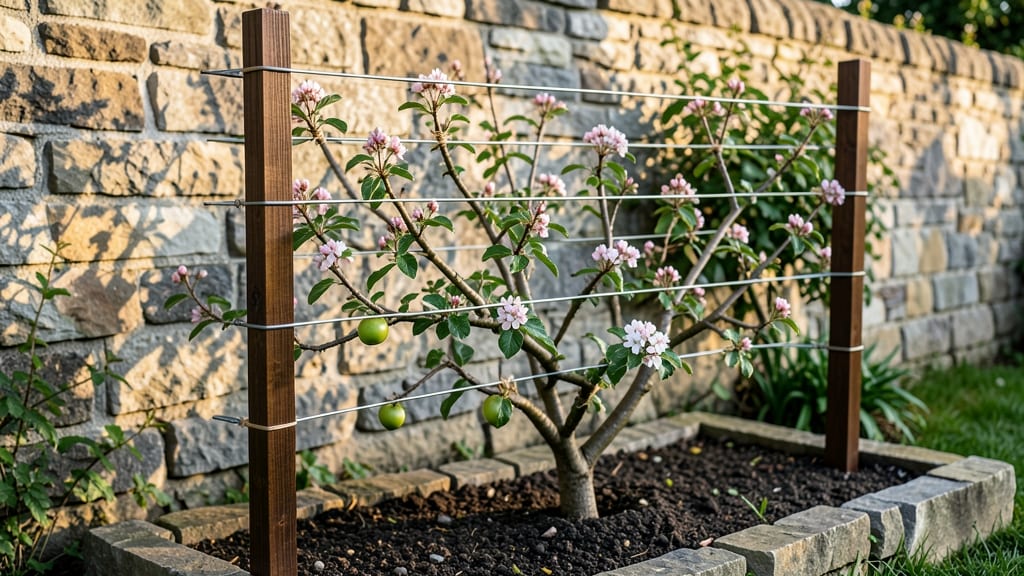
Transforming your backyard into a compact orchard starts with an espalier apple tree trellis—where form meets function in the most satisfying way. 🌳 I’ve watched my own espaliered trees turn a cramped corner into a living work of art, bearing fruit while saving space.
The secret lies in the trellis: sturdy, elegant, and designed to guide the tree’s growth into a flat, decorative shape. You’ll need just a few materials—a sturdy wooden or metal frame, flexible branches, and a little patience.
The trellis itself can be as simple as a 4-foot-tall grid or as intricate as a lattice backdrop, depending on the look you want. Whether you’re training a dwarf variety or shaping a standard tree, the result is a tree that fits your space and your style.
By summer’s end, you’ll have a tree that produces abundant fruit while doubling as a focal point. The branches spread like a painting, and the apples dangle just inches from your fingertips—no ladder needed. It’s gardening as both practical and poetic.
Perfect for small yards, urban patios, or even as a decorative centerpiece. Here’s how to bring this vision to life—step by step.
📚 In This Guide
- What you need
- Instructions
- Tips and common mistakes
- Wrapping up and next steps
What you need
- ● Apple tree sapling: Dwarf or semi-dwarf variety (e.g., ‘Columnar’ or ‘Espalier’-friendly cultivars like ‘Golden Delicious’ or ‘Gala’). Quantity: 1 per trellis.
- ● Trellis frame: Wooden posts (4x4 inches, 6–8 feet tall). Quantity: 2–4, depending on trellis size.
- ● Horizontal support beams (2x4 inches). Quantity: 3–5, spaced 12–18 inches apart vertically.
- ○ Optional: Metal or PVC pipes for a modern look.
- ● Trellis wire or netting: 14–16-gauge galvanized wire or fruit-tree netting (10–20 feet, depending on trellis dimensions).
- ● Stakes or anchor points: Heavy-duty stakes or screws to secure posts.
- ● Pruning tools: Bypass pruners (for clean cuts).
- ● Loppers (for thicker branches).
- ● Garden twine or soft ties: For training young branches (10–20 feet).
- ● Potting soil or planting mix: High-quality, well-draining soil (50 lbs bag).
- ● Mulch: Organic mulch (e.g., straw or wood chips) to retain moisture.
- ● Post hole digger or auger (for securing wooden posts).
- ● Level (to ensure trellis is straight).
- ● Concrete mix (for stabilizing posts in windy areas).
- ● Fruit tree fertilizer (balanced NPK, 10-10-10 ratio).
- ● Decorative elements (e.g., painted wood, climbing roses for a cottage-garden vibe).
Step-by-Step instructions for building an espalier apple tree trellis
Turn your small yard into an orchard with this elegant, space-saving method that transforms ordinary walls into fruit-bearing art.
🪴 Step 1: Choose and Prepare Your Trellis Structure
Start with a sturdy wooden lattice panel or metal grid that's at least 4 feet tall and 3 feet wide—this gives your apple tree room to spread horizontally while staying compact. I like to use cedar planks because they resist rot and last for years. Secure your trellis to a south-facing wall (in the Northern Hemisphere) for maximum sunlight exposure.
Position the bottom of the trellis 3-4 feet off the ground—this keeps the fruit harvestable without bending over. Use galvanized screws (not nails) to attach the trellis to the wall, ensuring it's level with a carpenter's level. If your wall isn't perfectly straight, adjust the trellis slightly to create a fan shape—this encourages better airflow and sunlight penetration.
☀️ Step 2: Select and Train Your Apple Tree
Choose a dwarf apple tree variety like 'Columnar' or 'Spindle Bush'—these are bred for compact growth and work perfectly with espalier. Plant your tree 6-12 inches away from the trellis, ensuring the root ball sits flush with the wall. The goal is to have the tree's trunk grow upright while its branches spread flat against the trellis like a painting.
When your tree is 1-2 years old (and has reached the trellis height), begin training. Select 4-6 strong branches—two on each side—and gently tie them horizontally to the trellis wires using soft plant ties. Never force branches; let them grow naturally while guiding their direction. You'll know you're doing it right when the branches follow the trellis lines like a vine climbing a fence.
✂️ Step 3: Prune and Shape for Optimal Fruit Production
Prune in late winter or early spring before new growth begins. Remove any suckers (shoots growing from the trunk or roots) immediately—they drain energy from your fruit-bearing branches. Cut back overlapping branches to improve airflow, and thin out weak or crossing branches to prevent disease. Always make cuts at a 45-degree angle just above an outward-facing bud.
Shape your tree into a fan or candelabra style: the fan spreads branches evenly across the trellis, while candelabra stacks branches vertically. For a fan, keep branches parallel to the ground and spaced 8-12 inches apart. For candelabra, let 3-4 main branches grow upward at 45-degree angles, each with its own horizontal tier. Watch for fruit spurs (small clusters of buds) forming along the branches—these are where your apples will grow.
🌿 Step 4: Maintain and Harvest Your Espalier Apple Tree
Water deeply once a week during dry spells, focusing on the root zone (not the leaves). Espalier trees have limited root space, so consistent moisture keeps them healthy. Fertilize in early spring with a balanced fruit-tree fertilizer, following package instructions. I like to add compost around the base in fall to boost soil health for next year's growth.
Harvest apples when they easily detach from the tree with a slight twist. For most varieties, this happens in late summer to early fall. Gently place a fruit pickers' ladder against the trellis to reach higher branches safely. After harvest, clean up any fallen leaves or debris to prevent pests and diseases from overwintering. In late winter, repeat the pruning process to maintain your tree's shape and encourage new growth.
Tips & tricks for perfect espalier apple tree trellis
Transforming your wall into a fruit-bearing masterpiece takes patience and precision—here's how to avoid common pitfalls and create a trellis that lasts.
Material Matters: Cedar planks are my go-to because they resist rot and last for years, but if you're using metal grids, make sure they're coated to prevent rust from staining your wall. I've seen uncoated metal trellises corrode in just two seasons—trust me, it's not pretty. Also, avoid pressure-treated wood near fruit trees, as the chemicals can leach into the soil and affect your apples' flavor.
Training Technique: When you're training branches in Step 2, don't rush the process. I learned this the hard way after snapping a branch trying to force it into position. Use soft plant ties and adjust them gently every few weeks as the branch grows. Think of it like teaching a child to ride a bike—you guide them, but they need to find their own balance. The branches should follow the trellis lines naturally over time.
Pruning Precision: Those 45-degree angles in Step 3 aren't just for show—they're crucial for directing growth. When you make cuts, look for outward-facing buds just above where you're cutting. This ensures new growth will spread away from the trunk, creating that beautiful fan shape. I always mark my cuts with a pencil first to visualize where the new branch will emerge before making the final cut.
Maintenance Mindset: The once-a-week watering in Step 4 is non-negotiable during dry spells, but don't drown your tree. Espalier trees have limited root space, so consistent moisture is better than occasional deep soakings. I've seen trees develop root rot from overwatering—always check the soil moisture before watering again. And that compost in fall? It's not just for show—it's fuel for next year's growth.
Pro Tips for Espalier Apple Tree Trellis
- Transforming your wall into a fruit-bearing masterpiece takes patience and precision—here's how to avoid common pitfalls and create a trellis that lasts.
- Material Matters: Cedar planks are my go-to because they resist rot and last for years, but if you're using metal grids, make sure they're coated to prevent rust from staining your wall.
- Training Technique: When you're training branches in Step 2, don't rush the process.
Frequently asked questions
about espalier apple tree trellises—because every gardener’s got questions! Here are the most common ones, answered in plain terms.What’s the best time of year to plant an espalier apple tree?
Plant your espalier apple tree in early spring (just as buds swell) or late fall (before the first hard frost). This gives roots time to establish before extreme weather hits. Avoid planting in summer—heat stress can stunt growth. Pro tip: If you’re in a warm climate, late fall works best to avoid summer drought.
Can I use any trellis for an espalier apple tree, or does it need to be special?
Not all trellises are created equal! Your espalier needs a durable, sturdy frame (wood, metal, or PVC) with horizontal wires or branches spaced 12–18 inches apart for proper training. Avoid flimsy garden trellises—they’ll sag under fruit weight. DIY options work if built to last!
How do I know if my espalier apple tree is getting enough sunlight?
Apple trees thrive on 6–8 hours of direct sunlight daily. If leaves yellow (chlorosis) or growth stalls, it’s a red flag. Check for nearby shade (buildings, tall plants, or even other trees). Move the trellis or prune obstructions—espaliers need unfiltered light to fruit well!
What should I do if my espalier branches keep breaking under fruit weight?
Weak branches = too much fruit or poor support. Thin out overripe fruit to reduce strain, and reinforce the trellis with extra ties or stakes. For persistent issues, consider dwarf rootstock varieties—they’re naturally sturdier. Never skip pruning weak spots!
Are there alternatives to traditional espalier trellises for small spaces?
Try a wall-mounted espalier (against a fence or house), a fan-shaped trellis, or even a freestanding A-frame. Vertical planters or obelisks also work—just ensure they’re tall enough (6+ feet) for apple trees. Get creative with repurposed materials (like old ladders) for a rustic look!
Wrapping up and next steps
Transforming your space into a stunning, space-saving orchard with an espalier apple tree trellis is not just practical—it’s an art form! 🌳✨ Whether you’re a seasoned gardener or a curious beginner, this method lets you grow beautiful fruit trees in even the smallest of spaces while adding charm to your garden.
Now that you’re equipped with the right materials, techniques, and answers to common questions, there’s no better time to roll up your sleeves and create your own compact masterpiece.
Ready to take the next step? Start sketching your design, gather your tools, and plant that first branch! Your future harvest—and your neighbors’ envy—awaits.