
Pruning
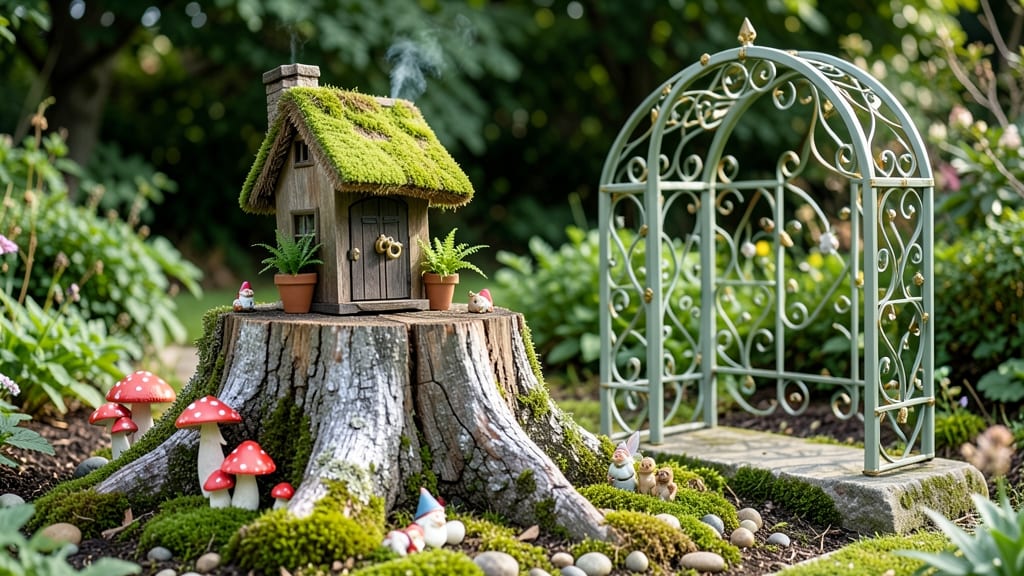
Turn that old tree stump into a fairy-tale gnome house roof that steals the show in your garden. ✨ The magic starts with a few simple supplies and a dash of creativity—no pruning skills required.
I transformed a weathered stump into a storybook scene, and your garden will be the talk of the neighborhood once you see how easy it is to add this rustic charm.
You’ll need basic woodworking tools, a few pieces of scrap wood for the roof, and some non-toxic paint or natural stains to match your garden’s vibe. The roof itself can be as simple as a triangular shingle or as elaborate as a tiny thatched cottage—whatever fits your fairy garden’s theme.
My first attempt used reclaimed barn wood for a rustic look, but you could also go for bright colors if you’re feeling playful.
Once complete, your gnome house will become the centerpiece of a whimsical corner, complete with tiny doors, moss-covered roofs, and maybe even a little bridge. Kids will love spotting it, and adults will appreciate the creativity.
The best part? It’s a project that grows with your garden—add more details over time as inspiration strikes.
Perfect for fairy gardens, storybook-themed landscapes, or just adding a touch of magic to your outdoor space. Whether you’re crafting for fun or to impress visitors, this project proves that garden decor doesn’t have to be complicated—just charming. Let’s get started!
📚 In This Guide
- What you need
- Instructions
- Tips and common mistakes
- Wrapping up and next steps
What you need
- ● Tree stump: A sturdy, flat-topped stump (4–8 inches in diameter, 6–12 inches tall). Ensure it’s dry and free of rot.
- ● Roofing material: Option 1: Cedar shingles (12–15 pieces, ~6" x 12") or pre-cut roofing tiles.
- ● Option 2: Moss or faux moss (enough to cover the roof surface).
- ● Option 3: Shake roofing (split cedar shakes, 10–12 pieces).
- ● Adhesive: Exterior-grade wood glue or construction adhesive (for securing roofing).
- ● Fasteners: Galvanized roofing nails (1–1.5" long, ~10–15 nails) or small deck screws.
- ● Waterproofing: Roofing underlayment (1 small sheet) or outdoor-rated sealant.
- ● Decorative trim: Wooden shingles or cedar shakes (for roof edges, ~5–8 pieces).
- ○ Paint/stain (optional but fun!): Acrylic paint (earthy greens, browns, or whimsical colors) or outdoor wood stain.
- ● Hammer or nail gun (for roofing nails).
- ● Carpenter’s square (to ensure straight cuts).
- ● Utility knife or handsaw (for trimming roofing materials).
- ● Sandpaper (120-grit, for smoothing edges).
- ● Paintbrush or foam brush (if staining/painting).
- ● Measuring tape (to check stump dimensions).
- ● Safety gloves (for handling nails and rough edges).
- ● Miniature door or window (pre-cut wood or plastic, ~2–3 inches tall).
- ● Chimney kit (small metal or clay pipe, ~4" tall).
- ● Fairy lights or solar-powered LED tea lights (for enchanting glow).
- ● Acrylic gems or beads (as "roof tiles" for a sparkly touch).
- ● Weatherproof sealant spray (to extend longevity).
Step-by-Step instructions for crafting a whimsical tree stump gnome house roof
This project turns an ordinary stump into a magical gnome abode—here's how to add that fairy-tale charm.
🪴 Step 1: Prepare Your Stump Base
Start with a clean, dry tree stump—remove any loose bark or debris with a putty knife or sandpaper. I like to smooth the top surface with 120-grit sandpaper so the roof will sit flush and stable. If your stump has deep cracks, fill them with wood filler and let it dry completely before proceeding.
Measure the diameter of the stump's top—this determines your roof size. Most gnome houses fit best on stumps between 12-18 inches wide. Sketch a simple circle on paper to use as a template when cutting your roof pieces. Here's the thing—gnome roofs don't need to be perfect, just charming!
✂️ Step 2: Cut and Shape the Roof Pieces
Use cedar or pine boards (about ½-inch thick) for your roof pieces. Cut two identical A-frame triangles—each should be 8-10 inches tall at the center peak. The base of each triangle should match your stump's diameter. For a 16-inch stump, cut boards about 16 inches wide at the base.
Sand all edges smooth with 150-grit sandpaper, especially where the roof will touch the stump. Round any sharp corners slightly—gnome houses feel more magical with soft, inviting curves. I always stain my cedar pieces with natural wood stain to weatherproof them before assembly.
🎨 Step 3: Assemble and Decorate the Roof
Attach the two A-frame pieces together at the peak using wood glue and small finishing nails (or a staple gun for a rustic look). Let the glue dry completely before handling. Once assembled, position the roof on the stump and trace its outline with a pencil—this ensures a perfect fit when you attach it later.
Now for the fun part! Paint the roof with acrylic craft paint in colors like mossy green, slate gray, or weathered brown. Add shingle-like texture with a dry brush technique—just dab a stiff brush lightly over the paint while it's still wet. For extra whimsy, glue on tiny roofing tiles or wooden shingles around the edges.
🪵 Step 4: Secure the Roof and Add Final Touches
Apply wood glue around the traced outline on your stump, then press the roof into place. Secure it with hidden brackets or exterior-grade screws driven at slight angles from underneath. Cover the screw heads with wood filler and sand smooth once dry. I like to add a small chimney (made from a mini PVC pipe) for that classic gnome-house look.
Finish with decorative elements: a tiny door (cut from bark or wood), pebble pathway around the base, or moss accents on the roof. Place your gnome house in a shady garden spot where it can become a magical focal point. The key is to keep it simple—gnome houses thrive on charm, not complexity!
Tips & tricks for perfect tree stump gnome house roofs
Common pitfalls—and how to sidestep every one—when building your enchanting gnome house roof.
Material Selection: Cedar is my go-to for roof pieces because it naturally resists rot and holds paint beautifully. If you can't find cedar, pine works too, but seal it with natural wood stain right away to prevent weathering. The ½-inch thickness mentioned in Step 2 is perfect—thinner boards might warp, while thicker ones could look bulky for a gnome house.
Cutting Accuracy: When cutting those 8-10 inch tall A-frame triangles in Step 2, mark your cuts with a pencil first. I use a carpenter's square to ensure the angles are precise—this makes assembly in Step 3 much easier. For stumps outside the 12-18 inch range, adjust your triangle base proportionally. A 10-inch stump? Cut 10-inch wide bases, not 16 inches!
Assembly Pro Tip: Before gluing the two A-frame pieces together in Step 3, do a dry run with just the nails. This lets you adjust the peak alignment before committing to glue. I also recommend pre-drilling small holes where the nails will go—this prevents the wood from splitting, especially with pine. Let that wood glue cure completely (usually 24 hours) before painting.
Weatherproofing: Don't skip the natural wood stain in Step 2! It protects your roof from moisture and UV rays, which can fade paint and warp wood. For extra durability, add a coat of outdoor polyurethane after painting. This is especially important if your gnome house will sit in a damp or sunny spot—gnome roofs deserve to last!
Pro Tips for Tree Stump Gnome House Roof
- Common pitfalls—and how to sidestep every one—when building your enchanting gnome house roof.
- Material Selection: Cedar is my go-to for roof pieces because it naturally resists rot and holds paint beautifully.
- Cutting Accuracy: When cutting those 8-10 inch tall A-frame triangles in Step 2, mark your cuts with a pencil first.
Frequently asked questions
What’s the best material for a tree stump gnome house roof?
A durable, weather-resistant roof is key! Opt for cedar shingles (natural and rustic) or polycarbonate sheets (lightweight and long-lasting). For a whimsical touch, try slate tiles or even a miniature thatched look. Just ensure it’s sealed to prevent rot or leaks.
How long does it take to build a gnome house roof?
Time depends on your skill level and design complexity! A simple shingled roof takes 1–2 hours, while intricate details (like carved gables or moss accents) could stretch to 3–5 hours. Pro tip: Pre-cut materials and work in dry weather to speed things up!
Can I paint or stain the roof to match my garden?
Use outdoor-safe acrylic paint or non-toxic wood stain for a cohesive look. Earthy tones (greens, browns) blend seamlessly, while bold colors (reds, blues) add playful charm. Seal with a waterproof topcoat to protect against rain and UV rays.
Will the roof stay on during heavy rain or wind?
With proper securing, yes! Use waterproof adhesive or small nails/screws (hidden under trim) to attach the roof to the stump’s edges. For extra stability, Add a weight (like a flat stone) or reinforce with zip ties inside the structure.
What if I don’t have a tree stump—can I use something else?
No stump? No problem! Try a large mushroom cap, stacked logs, or even a decorative planter base as a foundation. Just ensure the base is sturdy and wide enough to support the roof’s weight. Get creative—fairies love repurposed magic!
Wrapping up and next steps
Transforming a simple tree stump into a whimsical gnome house roof is more than just a craft—it’s a way to bring joy, creativity, and a touch of fairy-tale magic to your garden. 🌿✨ Whether you’re a DIY enthusiast or a nature lover, this project is your chance to turn an ordinary stump into a charming centerpiece that sparks imagination.
Now that you’ve got all the tips, materials, and answers, it’s time to grab your tools and let your creativity run wild!
Ready to take the next step? Start small—pick a stump, gather your supplies, and dive in! You’ll not only enhance your outdoor space but also create a story-worthy focal point that delights visitors (and gnomes!) for years to come.